Fallout 4 is out tomorrow (read our review), but you shouldn’t go into the Commonwealth blind. If you do, it’ll swallow you up whole.
I’ve spent a bunch of time with Bethesda’s latest game, and I have tips that should help you survive. I’ll go over a few basic pointers before going a bit deeper into how the new settlement feature works and how you can get the most out of it.
Let’s go.
General tips
Set your auto-save to 5 minutes
Before you do anything else, you should ensure that you have the auto-save turned to its lowest setting.
Press the pause button, go down to settings, and scroll until you get to “Save in Pip-Boy.” Set it to 5 minutes. This will ensure that your game will auto-save after every 5 minutes when you open up your Pip-Boy interface. It defaults to 10 minutes, and while that might not sound like a huge difference, you can actually do a lot more than you would expect in that amount of time. It’s a real shame when you lose it after a death.
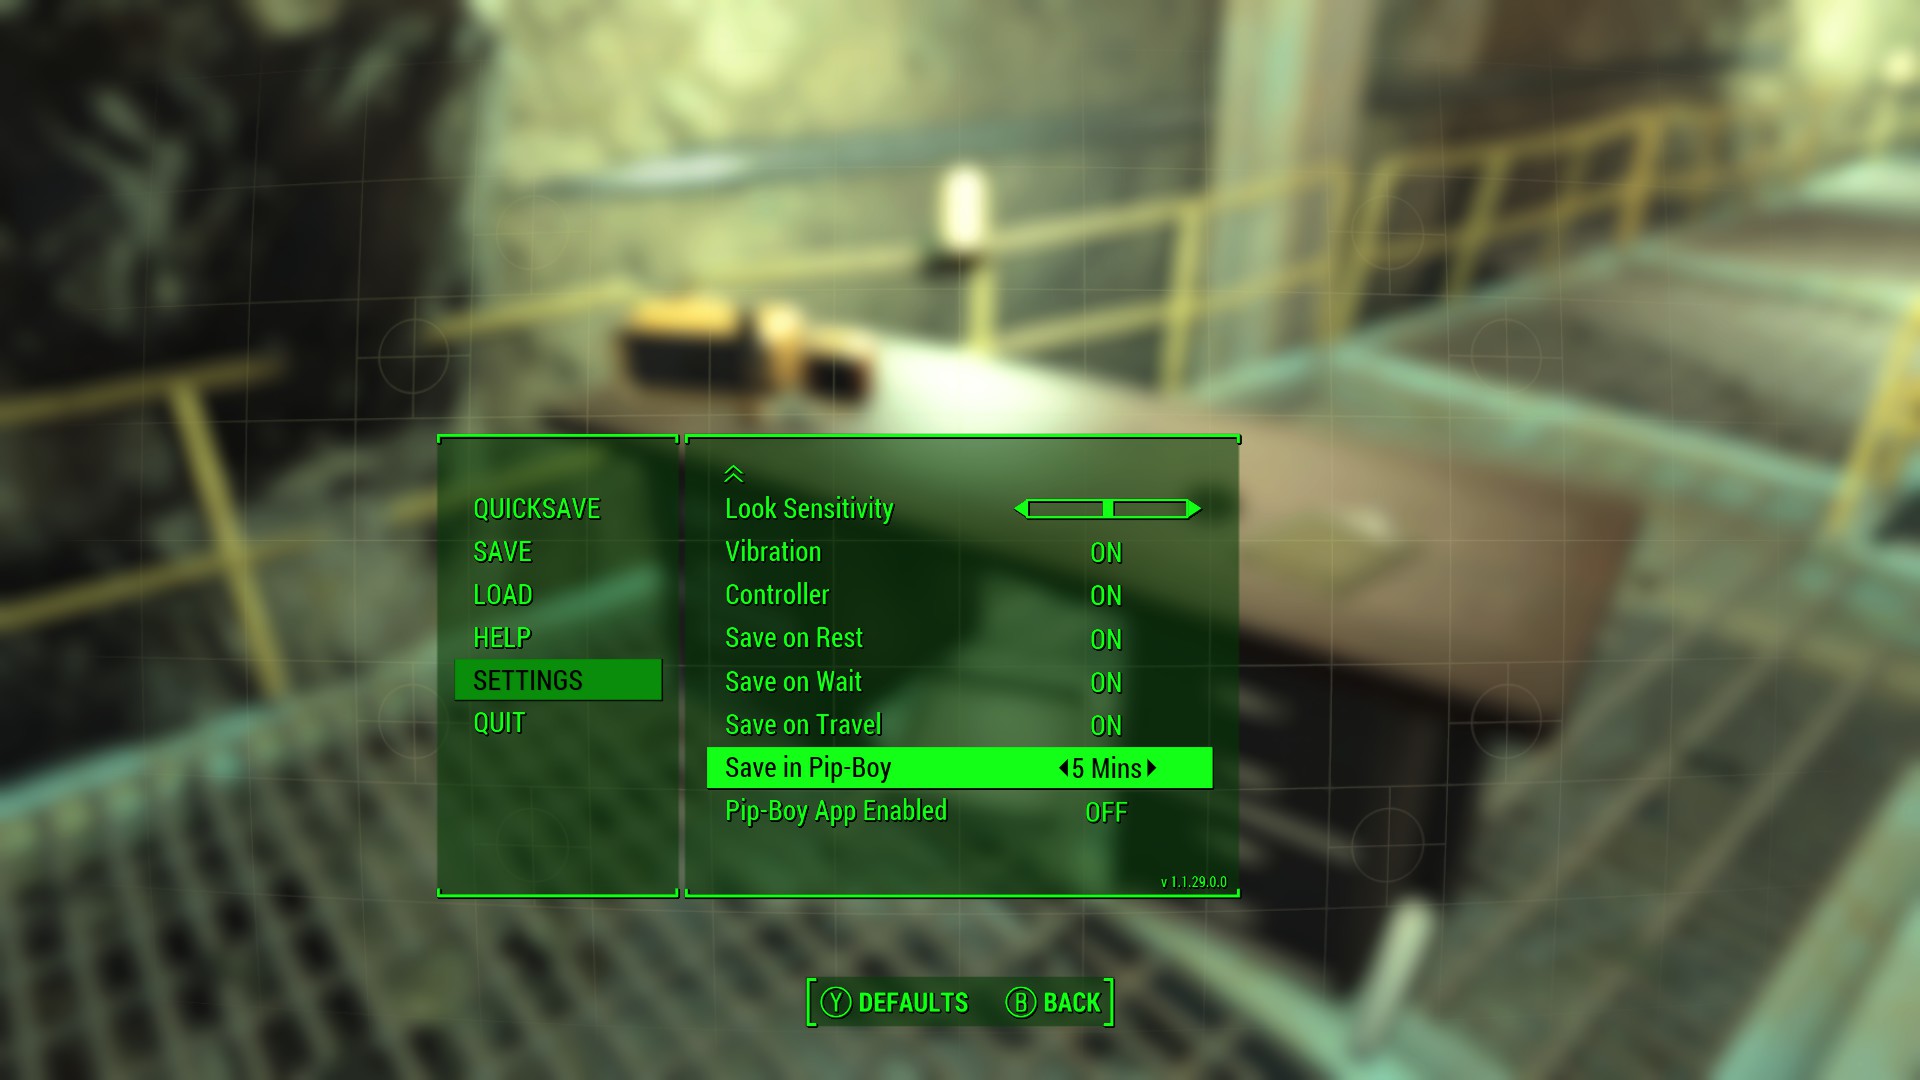
Above: This will decrease the chances that you’ll lose a lot of progress when you unexpectedly die.
How to deal with rads
Radiation poisoning is a real problem at the beginning of Fallout 4. My first tip here is to just accept that this is a fact of life and don’t stress too much about it. In this game, rads eat away at your health bar and lower your total HPs until you cure yourself.
The two most effective ways to rid yourself of rads are with the Radaway medicine and with a doctor. Radaway is rare and expensive, so it’s best to use it only if you have no other option. There is a doctor in Diamond City who will generally get rid of rads for around 40 caps, but you can build medical stations in any of your settlements.
Also, your probably only want to use the doctor or Radaway when you are severely affected by rads. If only 10 percent of your health meter is red, you should ignore it or take other measures.
This brings me to cooking meat
One of the best ways to deal with radiation is to stop it before it starts. As you collect chunks of meat from your kills, you can eat that raw to regain health but it will always cost you in radiation — unless you cook the meat first. Grilling up some steaks is a fast way to rid all of your meat of any rads.
But some meat is even more helpful. Here is a list of some recipes and how they can help you deal with radiation:
- Bake Bloatfly — Requires 2 Bloatfly meat — gives you increased radiation resistance
- Mutant Hound Chops — requires 1 Mutant Hound Meat — Remove 50 points of radiation
- Vegetable soup — requires 1 carrot, 1 dirty water, 1 tato — gives you +25 to Rad Resistance for 1 hour
Honestly, cooking is one of the best ways to get all kinds of important perks. You should almost never eat meat raw unless it’s an emergency.
How to find Dogmeat if you lose him
About 15 hours into my playthrough of Fallout 4, I lost Dogmeat. I picked another companion and sent my German Shepherd to Sanctuary Hills. When I went back to find him later, he was missing. I didn’t see him again … until I built a dog house that is.
This seems like a glitch. But until Bethesda fixes it, here’s how to bring back your dog:
Go to the settlement you sent Dogmeat to and enter the building mode. Go to Decorations and then Miscellaneous. The dog house is the fifth one. Place it somewhere in your settlement.
After that, the trick is time. I went to sleep for 24 hours, and that wasn’t enough to make Dogmeat spawn. But I went and did a few other things and returned, and there he was.
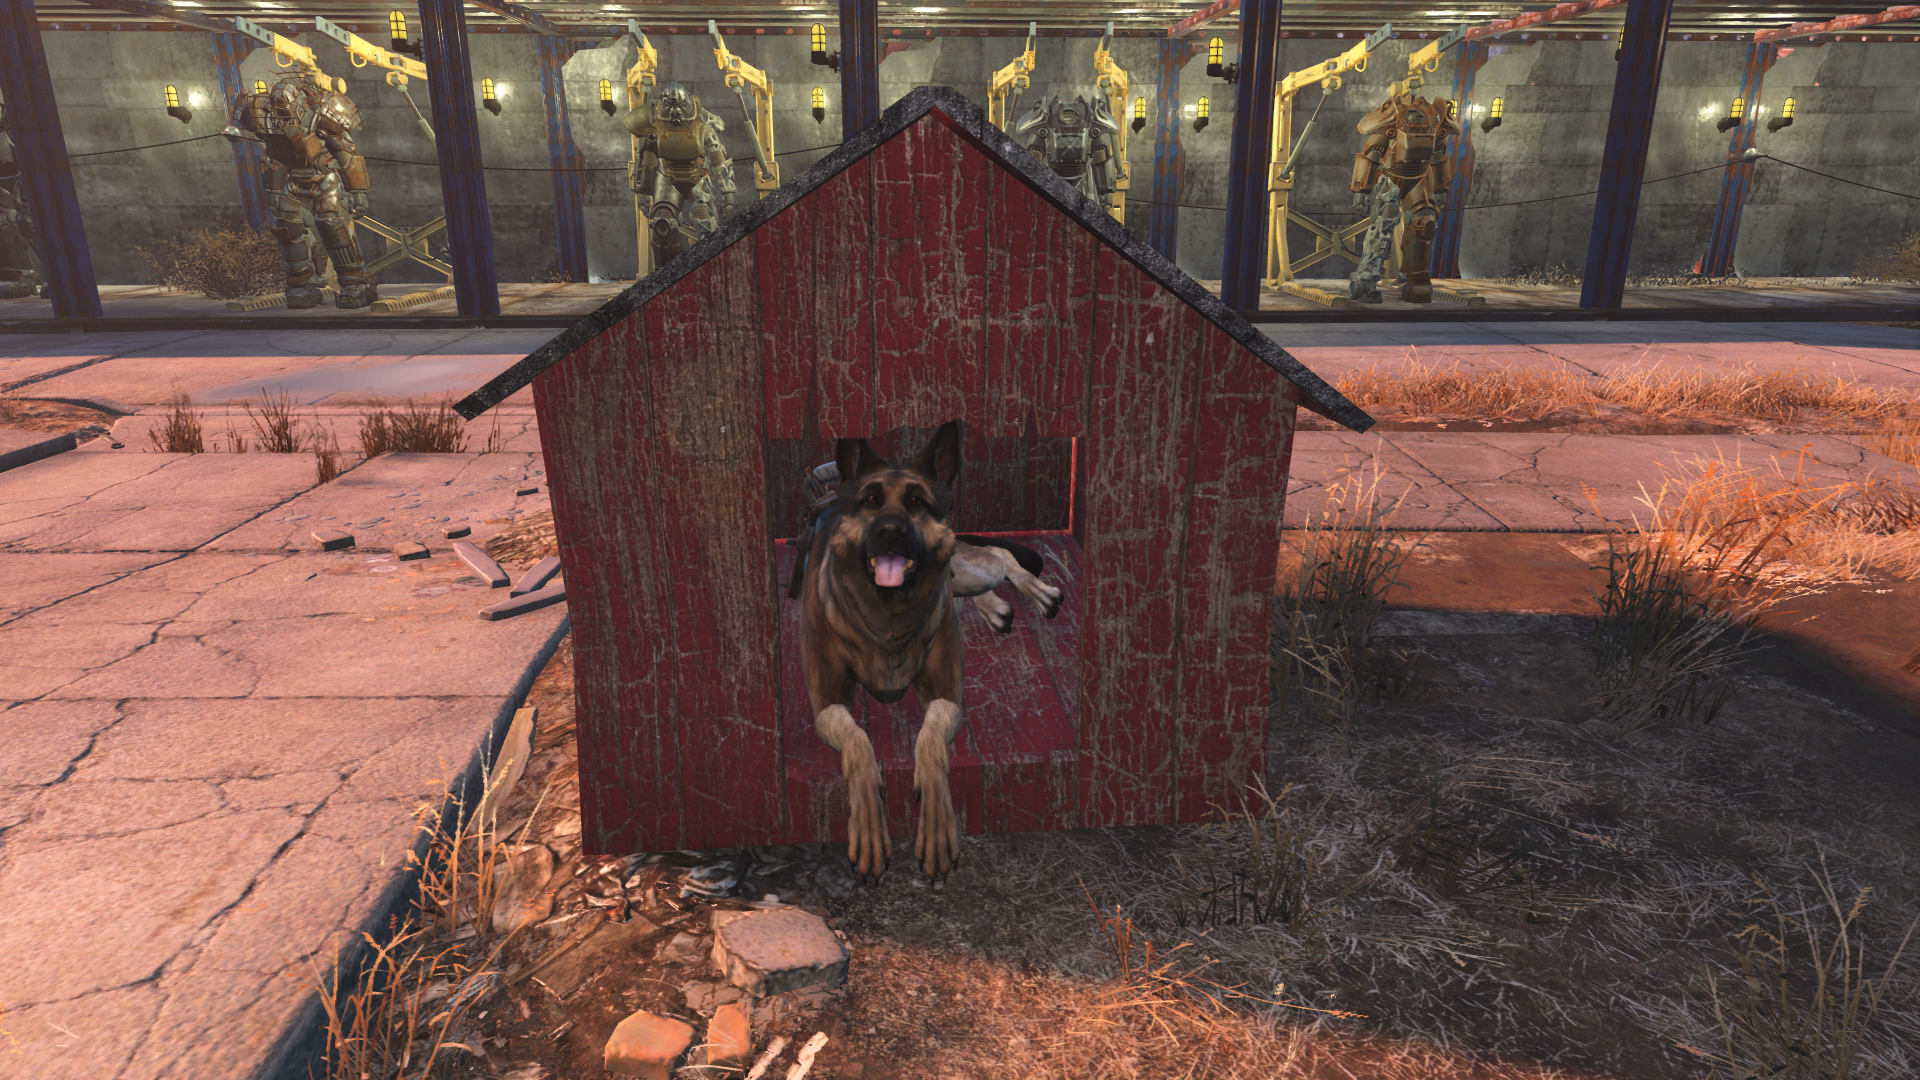
Above: Where were you! You’re a bad dog!
Collect all the junk — yes, even that plunger
In Fallout 4, Bethesda finally gives you a reason to collect all the random crap lying around the world. The new settlements feature a crafting element. You can build useful tools and buildings with that junk.
So it’s OK to pick up that plunger!
Tag items for search
I know what I just said, but don’t just collect anything. In order to craft the best items for your town, you’ll need some rare materials. These include cloth, adhesives, and copper — and, if you’re looking for that stuff, it’s not efficient to treat your backpack like a garbage bag. The good news is that you can find those things in items like prewar money, duct tape, and telephones. Only you don’t have to try to memorize what items contain what building scraps — instead, you can “tag” items for search.
This is when you are in the crafting interface, and you get to a point where you are trying to build something that you don’t have everything for. For example, if you are trying to build a bed, you’ll need steel and cloth. If you don’t have enough cloth, you can tap the tag button. This immediately puts a magnifying lens next to any item in the world that will produce that material.
Using this feature, you can quickly barter or scavenge for precisely what you need without having to fill up your inventory with less useful garbage.
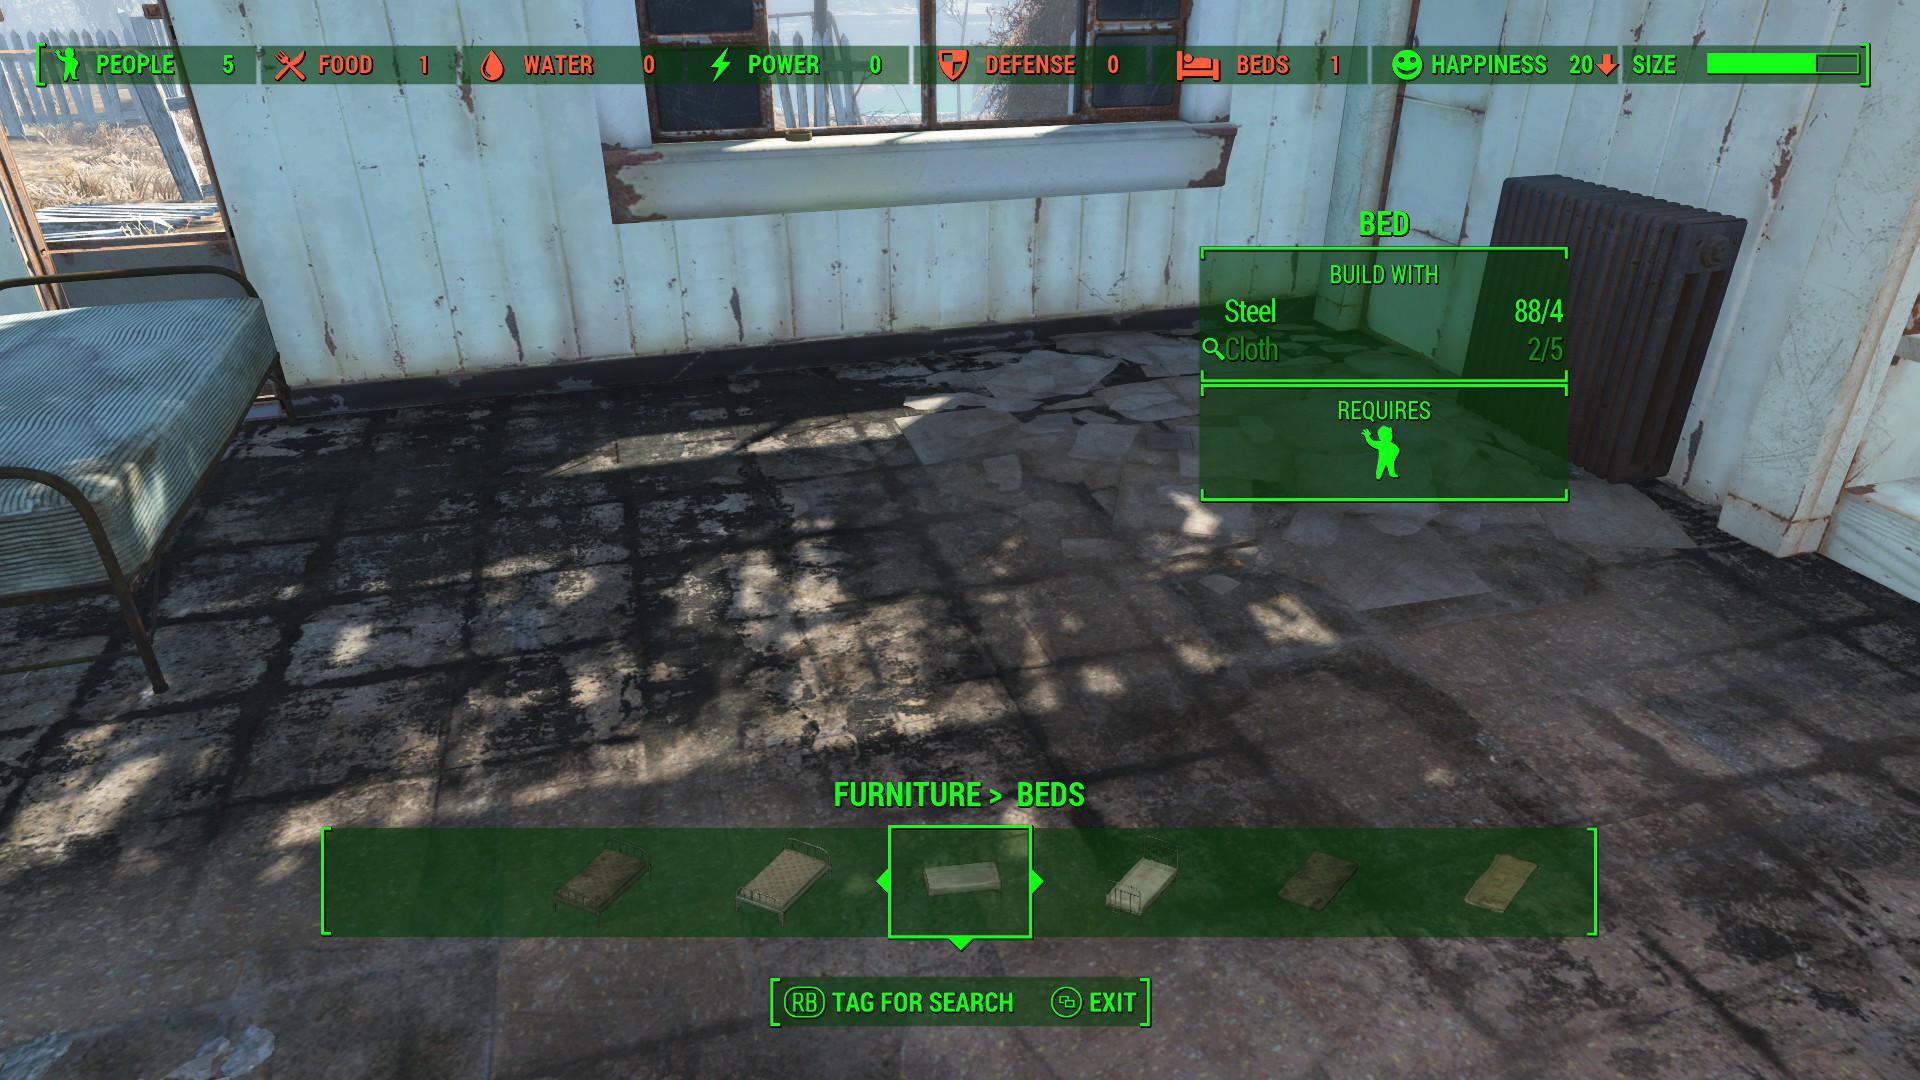
Above: Hit the right bumper to put a magnifying glass next to any item that may contain that materials you need.
Keep an eye on your status
Is your character dying faster than normal? Do they seem like they cannot carry as much as usual? Well, then you may have a status ailment or malady.
But finding out whether or not you have an addiction or a buff from a power-up is buried under a few menus. To see what you status is, go to your Pip-Boy, and go to the Status tab. Then hit the right bumper on a controller to “show effects.” This will let you know if you are currently drunk, high, or addicted to something.
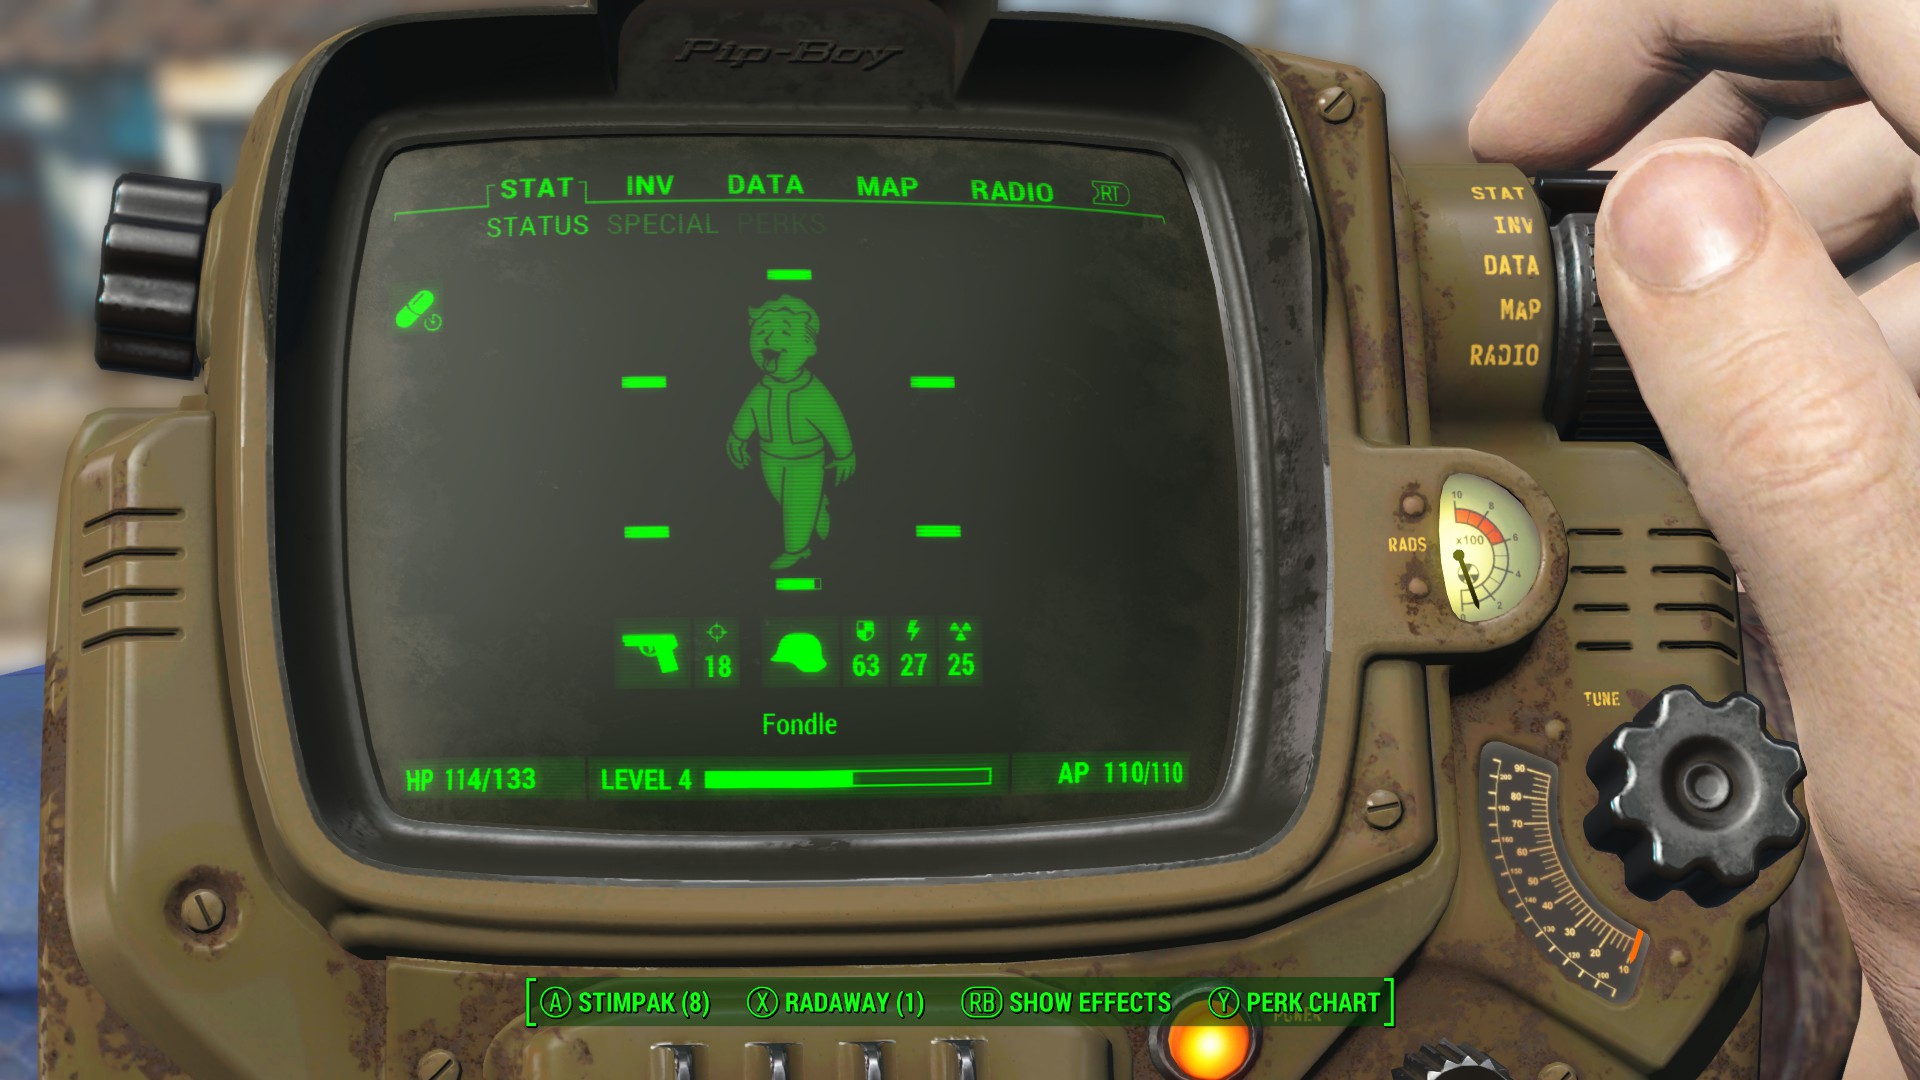
Above: This is what Vault Boy looks like when he is high. Hit RB to see what he is on!
Use your companion as a pack mule
This is a Bethesda RPG, so your inventory has a weight limit. If you have a companion, however, you don’t necessarily have to return right to a home base to dump all that junk into your workshop. Instead, give it to your dog, robot, or other buddy. Treat them as nothing more than a donkey with saddle bags!
Just don’t forget to unload what they are carrying as well when you finally do head back to a settlement.

Above: Give your dog the crap!
How to increase how much you can carry
If you are using your companions and still find yourself hitting the weight limit too quickly, you can focus on two perks to increase how much you can carry.
The basic Strength ability dictates how much you can carry, and it goes up to 10 points. This means that any time you rank up, you can put a point into strength to see an improvement to how much you can carry along with other strength-related improvements.
But if this isn’t enough (and it’ll make it so you can carry about 300 pounds without bonuses or power armor), you can also pour points into the Strong Back perk. This perk has four levels that increases how much you can carry by 25 pounds every time you level it up.
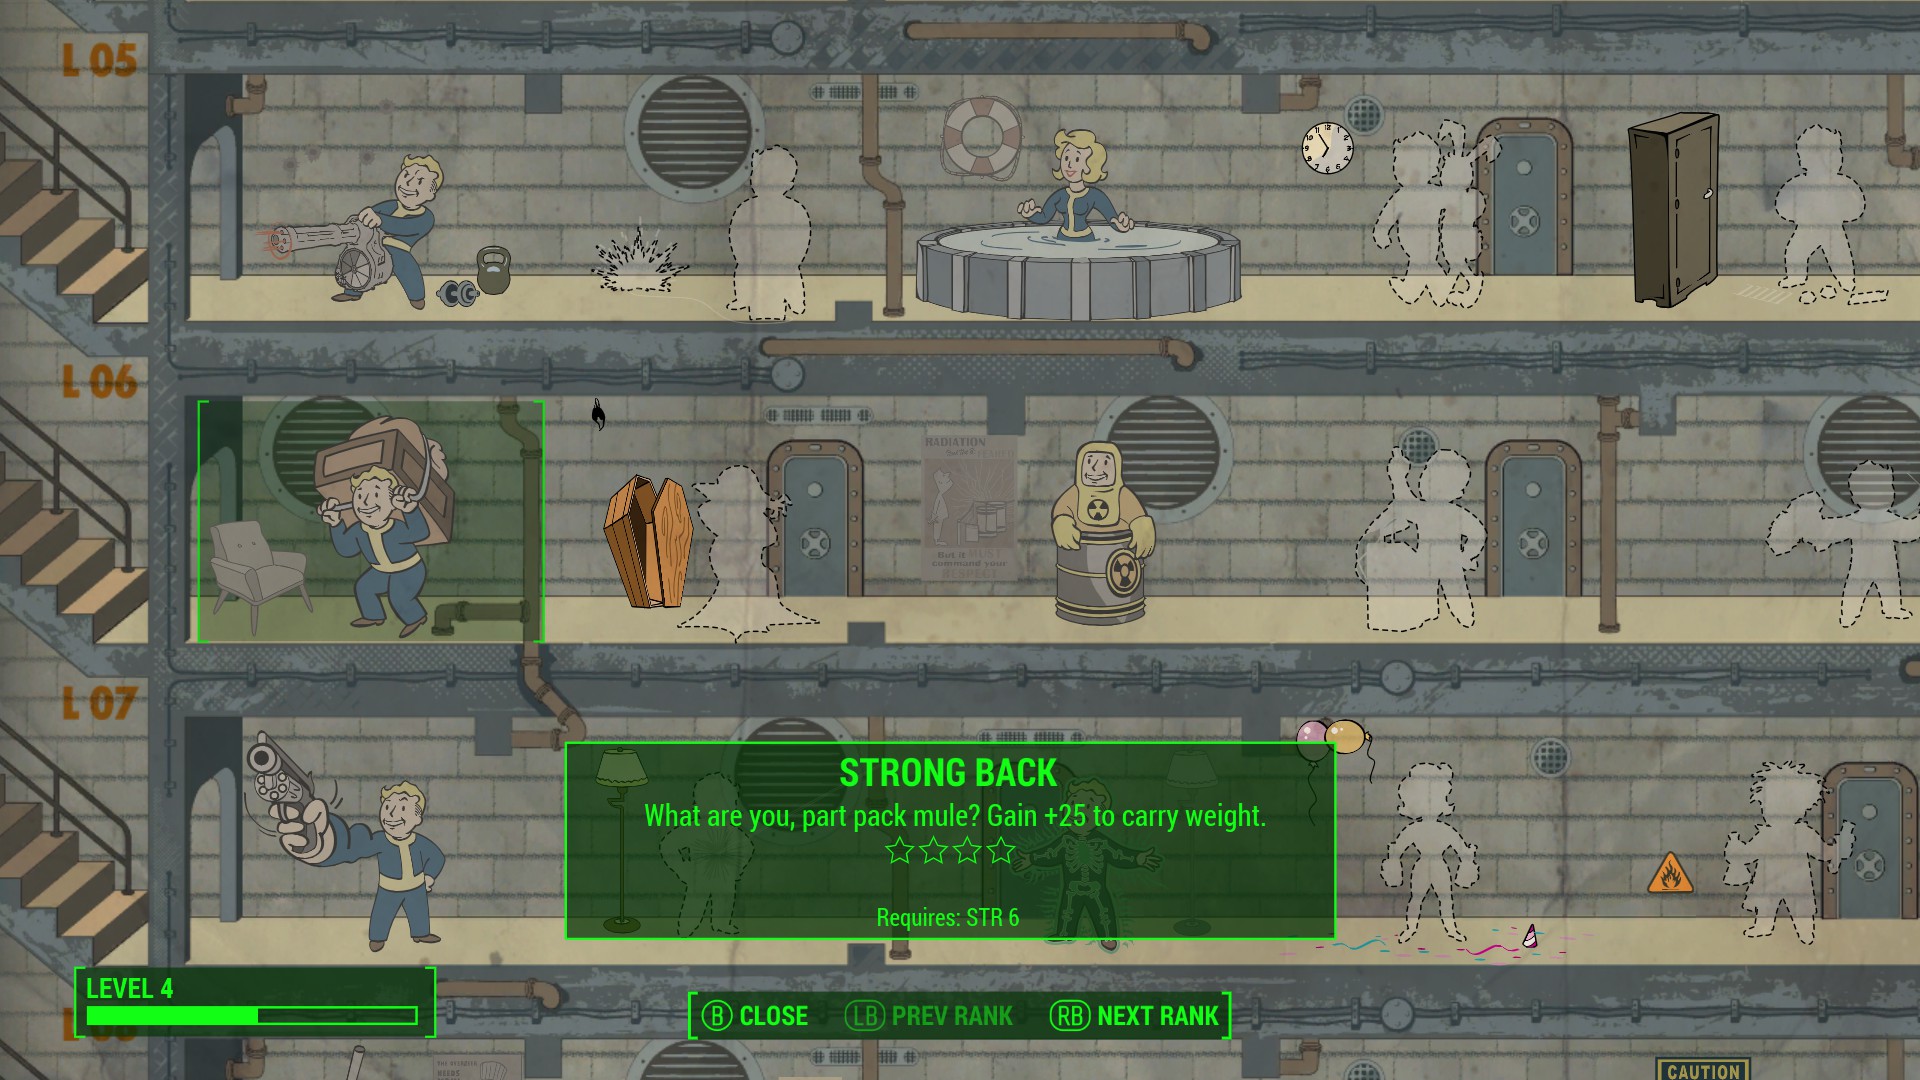
Above: This perk can quickly give a boost to how much you can carry.
Dog armor — and equipping your companions.
You don’t have to just make your partners carry stuff to lighten your load. You can also hand them more powerful weapons and attire. Yes, this even means you can put armor on your dog.
Just hit the equip button on compatible armor when you’re in the trade interface with your companion.
Avoid South Boston at the beginning of your adventure
You’re pretty weak when you first start. To have the best chance of surviving and leveling up, stick to the northern part of the map. The further south you go, the more dangerous it is … just like the real Boston!
Use V.A.T.S. to check your enemies’ levels and watch out for the skull
To quickly check if an enemy is something you can handle, tap the V.A.T.S. button. On the left side of their status bar, you should see their level.
Now, if you see a skull to the right of the enemy’s name, you should probably run. This emblem signifies that the opponent is fasr more powerful than you. You can probably still take them out with a Fat Boy and a nuke, but you’re taking a risk of dying.
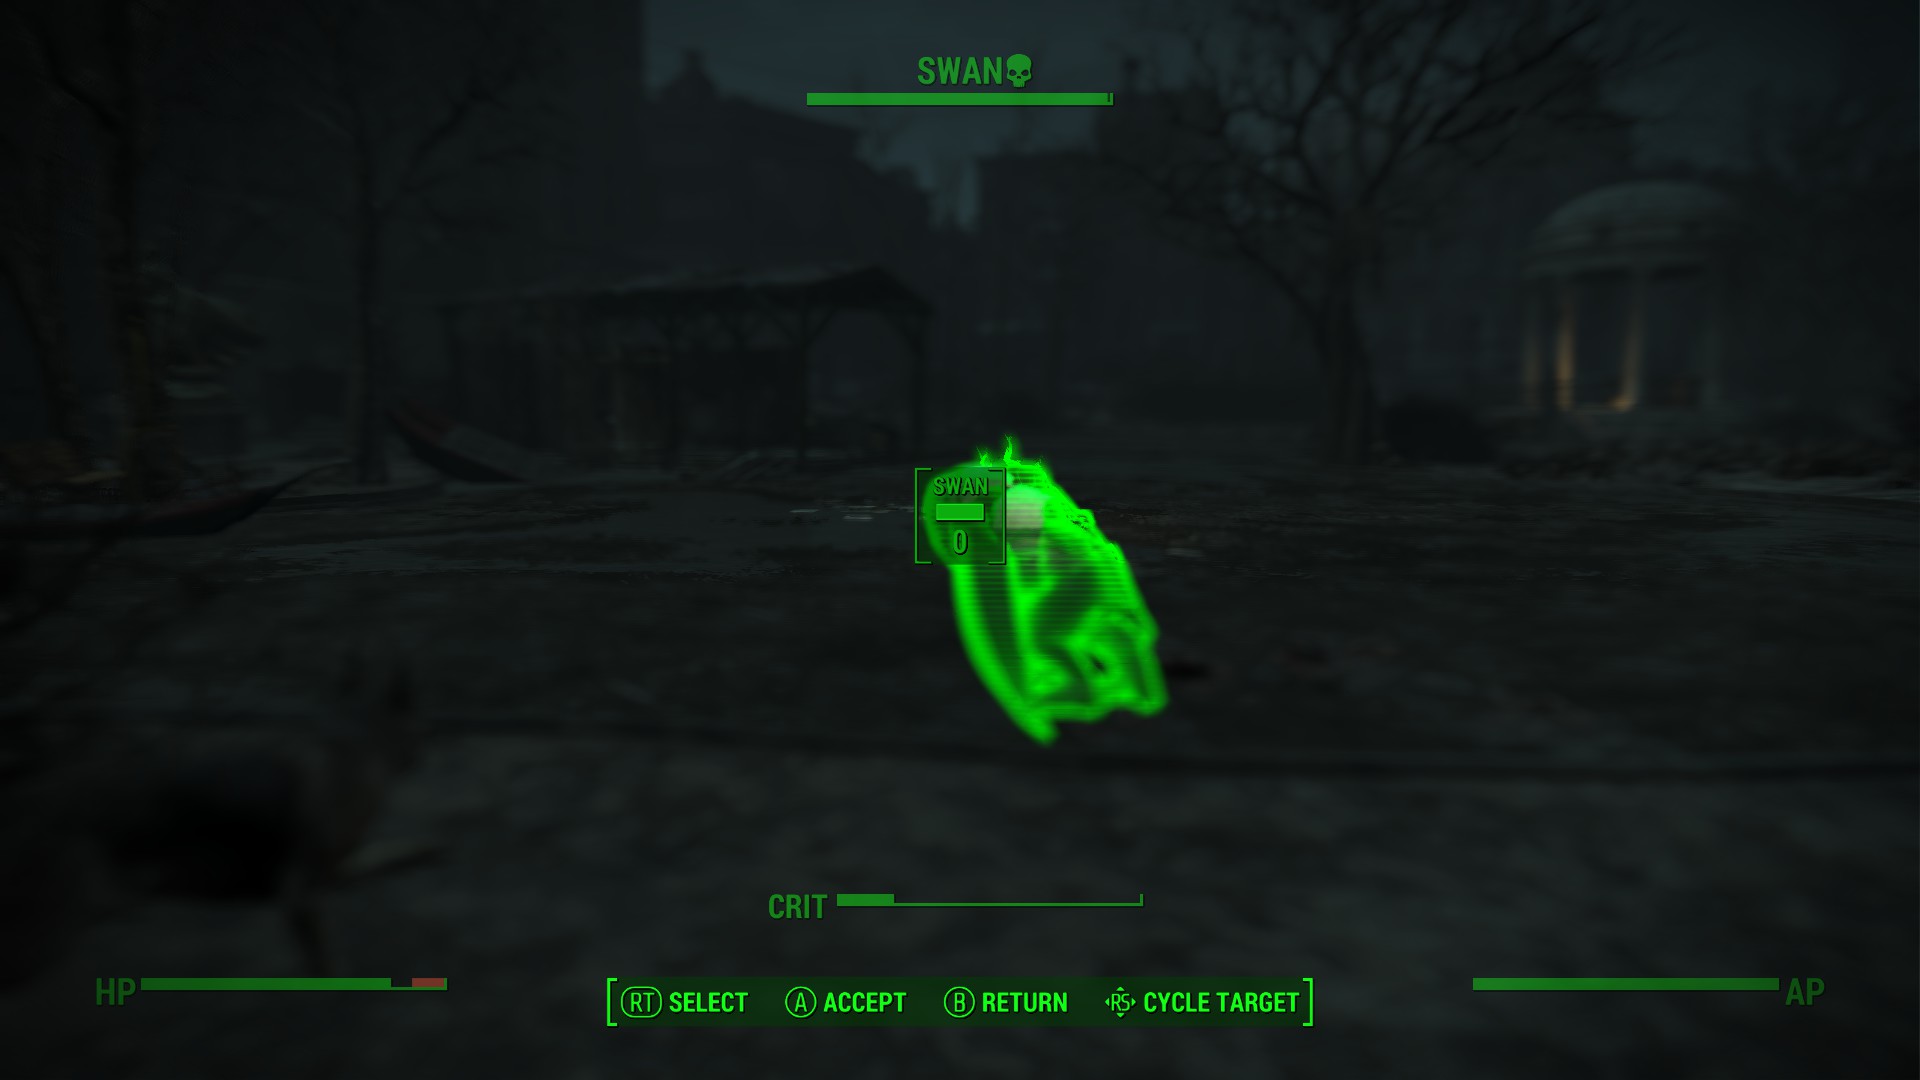
Above: This looks like it may require the atom bomb.
How to find the Freedom Trail and the password
If you are lost when it comes to the “Follow the Freedom Trail” quest, here’s what you need to do.

Above: Boston Commons is to the west of Diamond City.
Go to Boston Commons to the slight northwest of Diamond City. On the north side of that area, you should find a tour bot who will explain that you need to follow the red brick and paint line on the ground that leads you around to Boston’s many monuments and landmarks.

Above: Those red bricks leading away from that plaque is the start of the Freedom Trail.
This will eventually lead you to Old North Church, which is even further to the northwest.
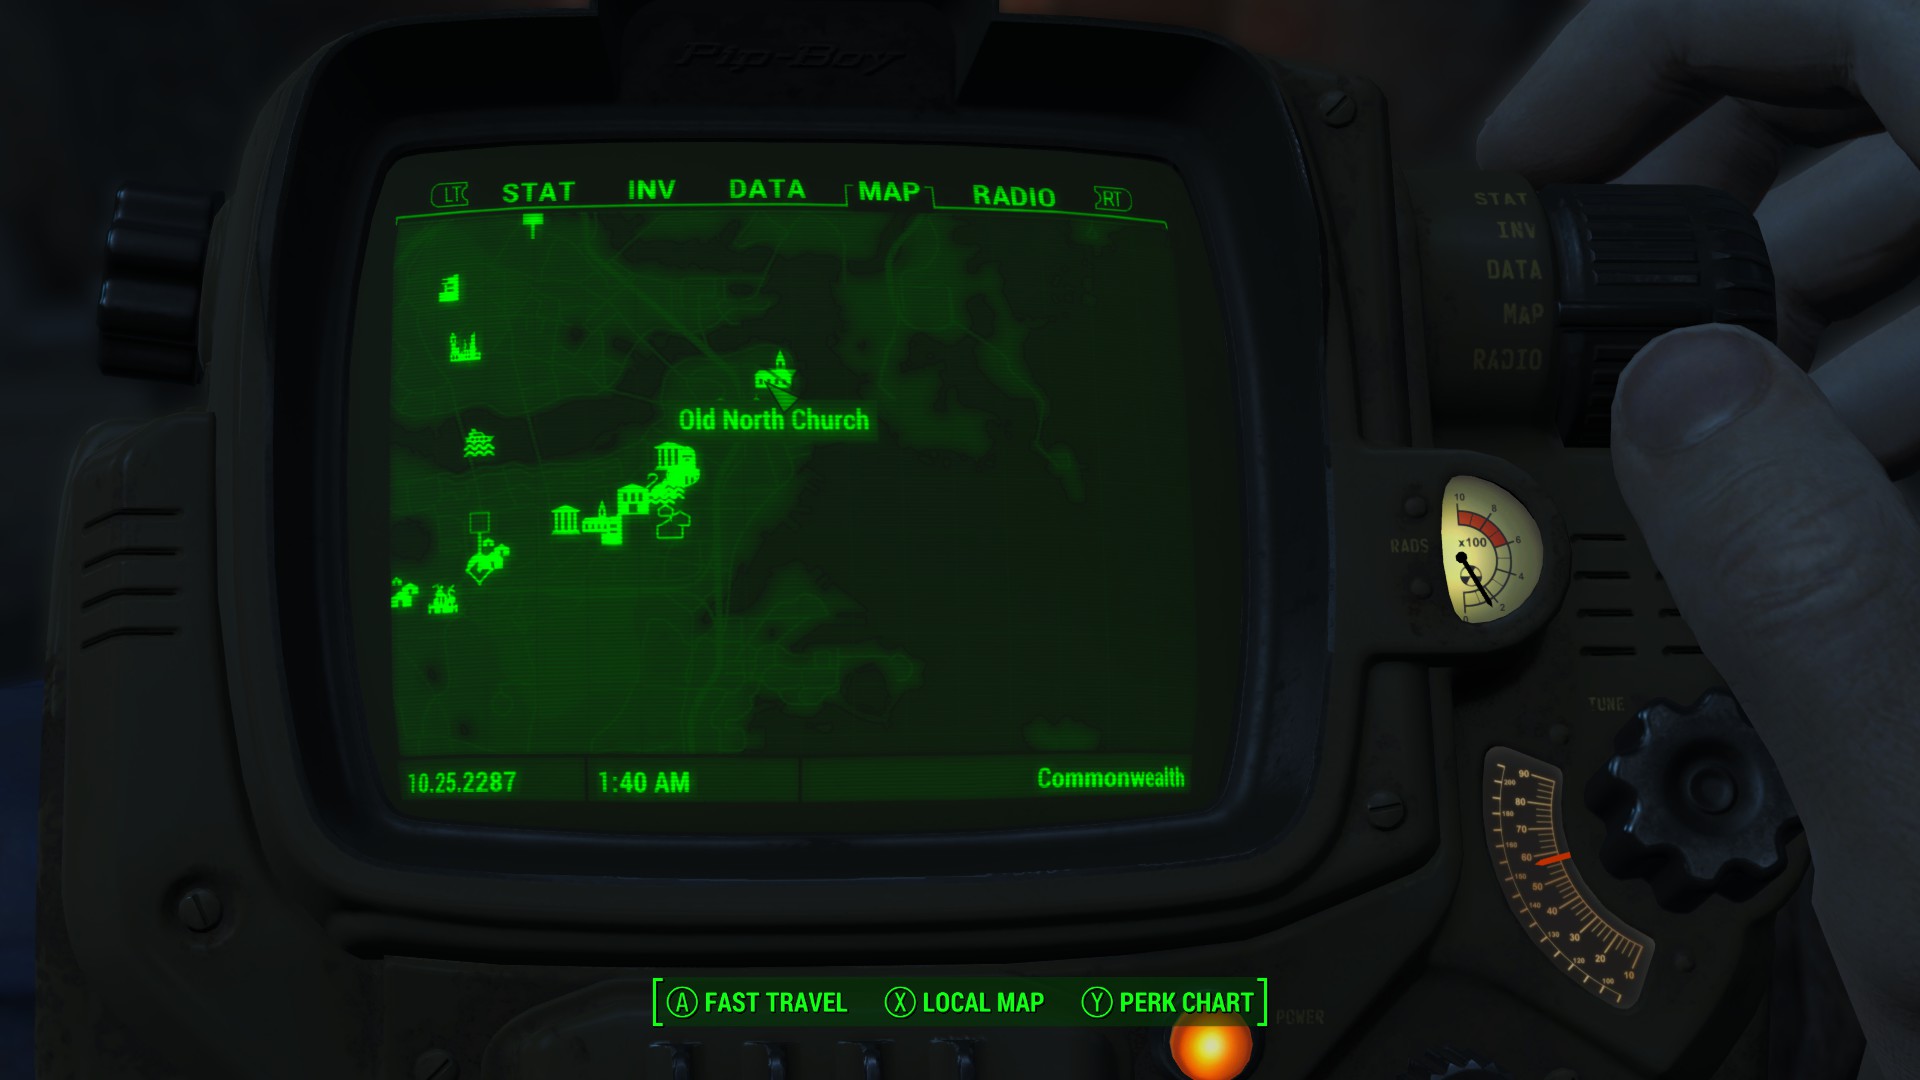
Above: Old North Church location.
Once you get there, go inside. Clear out the enemies, and head into the basement. Look for the white-painted logo that looks like a lantern to guide your way. Follow the corridors, taking out ghouls on your way, until you get to the entrance of an underground lair.
Here, you will see a device that you can twist and press. This is where you need to use the password that you got from the various markers on the Freedom trail. It’s a pretty easy code, but if you can’t figure it out, here it is: “RAILROAD.”
Twist the lock to spell out “railroad” while hitting the button after each letter. This will gain you access to the organization within, and that’s the end of the Freedom Trail.
Bonus: Give your dog a teddy bear
Finally, one last simple tip. Give your dog a teddy bear. Dogs love teddy bears.
How to build strong, efficient settlements
A big part of Fallout 4 is the settlement feature. This enables you to raise communities from out of nothing to give the good people of the Commonwealth a place to live.
We’ve got a few pointers for how to get the most out of your little towns.
Store all of your extra junk
You can craft all kinds of useful items for your villages, but that doesn’t mean you need to carry around all the materials with you. If you stuff anything extra in your workshop benches in your settlements, you’ll have access to all of that anywhere in the settlement. If you keep your workbench stocked with the junk you collect on missions, you’ll typically have just about everything you need to make critical items.
How to use electricity
When building settlements, it’s easy to get overwhelmed with wiring your town with lighting and other electric household goods. But it’s not quite as difficult as it seems.
It’s most important to understand that in order to get your energy from a generator to the lights, you need either a pylon or conduit. These two items actually have a wireless “area of effect” where they send power to surrounding devices. You can also string multiple pylons and conduits together with power lines. Also, in this same way, you can link up multiple generators to the same grid.
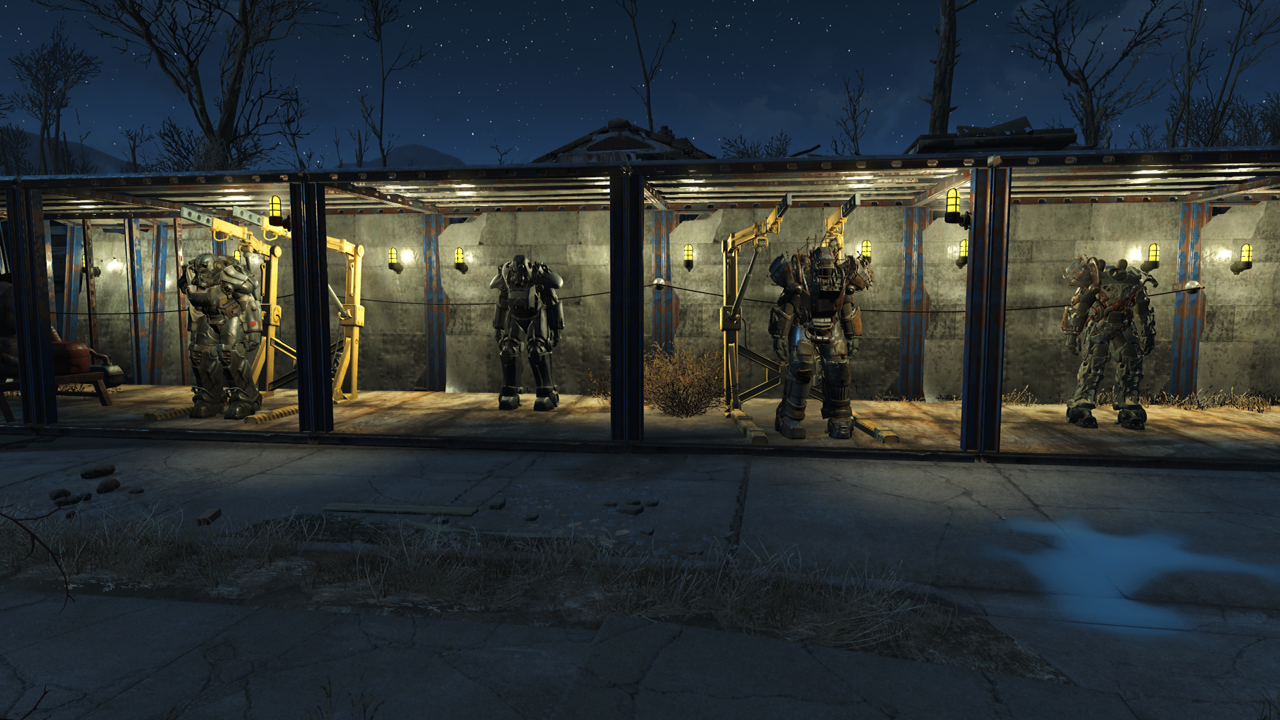
Above: You can see that I have pylons connected to wires running along the back of my Power Armor showcase.
The biggest problem with this is making sure you have enough copper and ceramics and other rare material to build everything you want.
Build radio towers
You’ll need to attract new settlers to your communities, and the best way to do this — other than providing enough food and water — is to put up a radio tower. A mission teaches you all about this, but it’s something you shouldn’t ignore. Having that signal go out into the wastes will help you get the population of your towns growing quickly.
Assign your workers wisely
Once you have enough people, you need to get them working on various projects. At the start, this primarily means security and farming, and your workers can do both of these things at once. But some more complex jobs will prevent your citizens from working on anything else, and that’s OK. When you put them on stuff like working a weapons stand, they’ll actually contribute money and other items that you can grab from your workbench.
Connect your towns
Once you get the Local Leader perk, you can start assigning your citizens to the supply line jobs. This will connect your towns so that you can share the supplies of your workbenches. This is incredibly useful.
To start a supply line, enter the workbench mode, and hit the right bumper button while highlighting one of your settlers.
Follow the Preston Garvey missions
Finally, Preston, the last of the Minutemen, will give you tips about other potential settlements around the commonwealth. This is beneficial because it eventually unlocks an attack that is even more powerful than a mini-nuke.
VentureBeat's mission is to be a digital town square for technical decision-makers to gain knowledge about transformative enterprise technology and transact. Learn More
