Call of Duty: Black Ops III has been one of the bestselling games of the holiday season, and it’s also one of the most engaging, as players are still spending hours with Black Ops III’s multiplayer online combat. But there’s no tutorial for multiplayer, unless you count the single-player campaign and the fairly lightweight “free run” sessions where you square off against artificial intelligence bots.
Our troubles are not tiny in the grand scheme of things, as Call of Duty games have generated more than $11 billion in the past decade, thanks in no small part to the fact that 40 million or so players stay engaged with the games every month, even long after initial launch dates. Many of those players love showing off how hardcore they are, and how they can completely dominate “noobs,” or new players. As the holidays approach, you may have more time to get back into it. This guide will hopefully get you better results in what I consider to be the best shooter game of the year and the best Call of Duty game in many years.
If you’re having a hard time succeeding in multiplayer, I feel your pain. I have engaged in Call of Duty multiplayer combat for more than decade. But I often have to exercise my privilege of being a game journalist and interview the game designers for tips in what is basically a thinly disguised Call of Duty therapy session. This year, I interviewed David Vonderhaar, game design director at Treyarch, the developer of Black Ops III, for tips on how to do better.
And guess what? I’ve improved some. Not dramatically. But my scores are getting better.
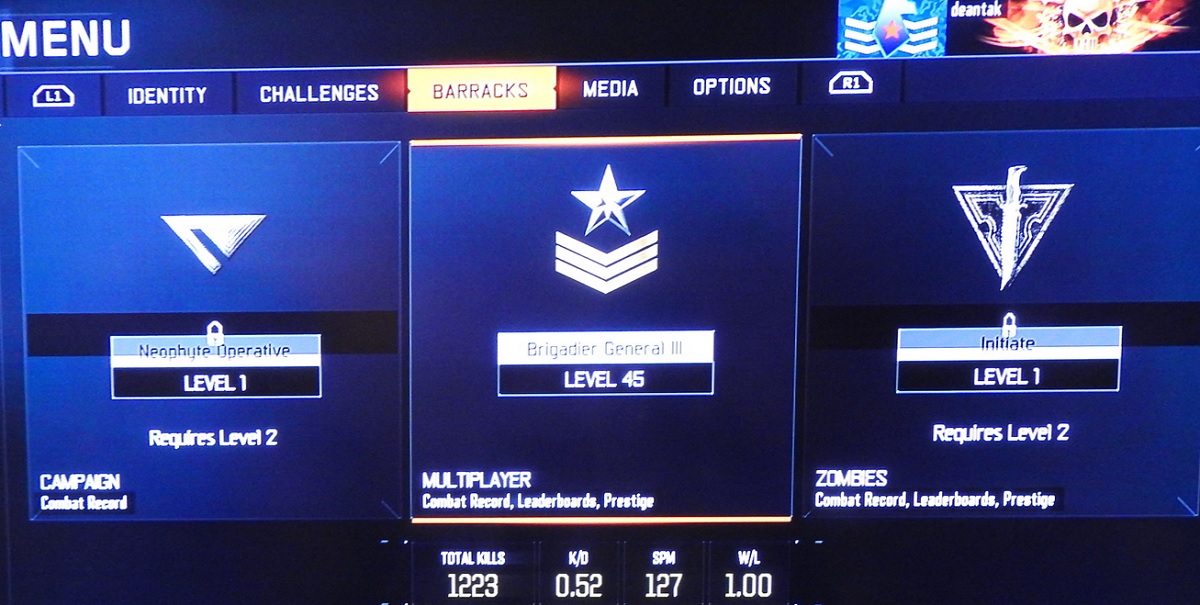
Above: This is slightly outdated, as I’m now a Major General III. Only seven levels away from the top level, Prestige.
At the time that I interviewed Vonderhaar in mid-November, I had worked my way up to Level 14 and I had a kill-to-death ratio of 0.42. For every four kills I got, I was killed 10 times. Considering that I’ve played for so long, that was an exercise in frustration. Was I really that much slower in my reaction times than the youngsters who dominate the game? After I talked to Vonderhaar, however, I started paying more attention to what was important. And I improved.
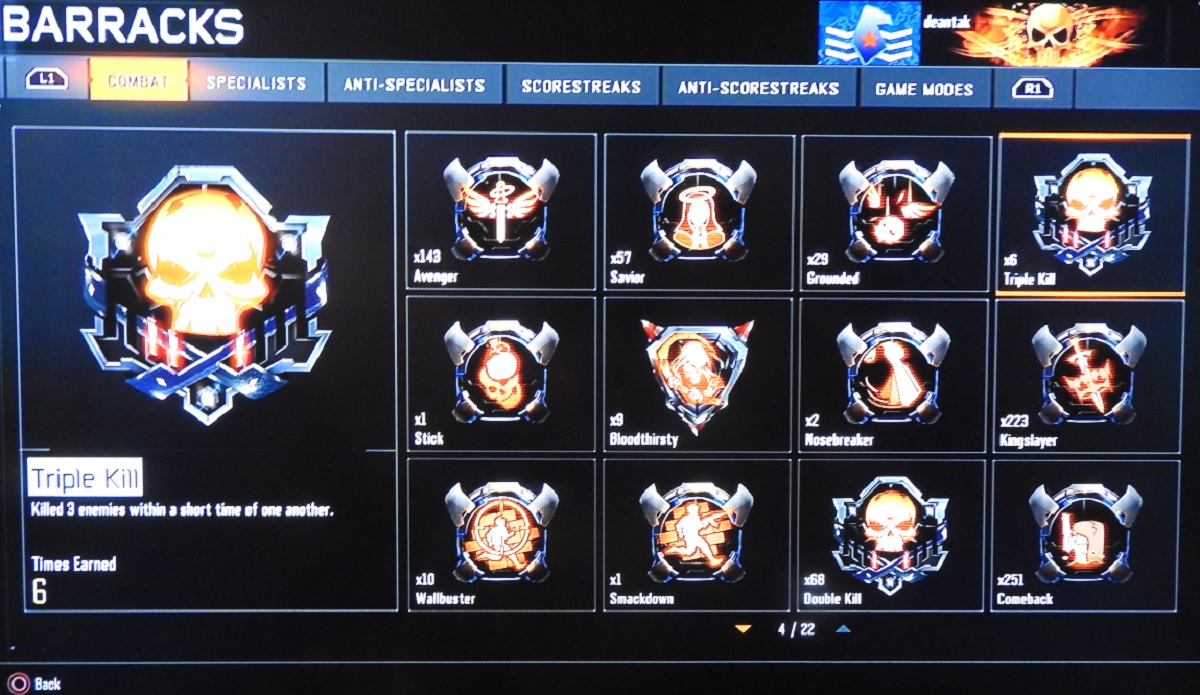
After about 23 hours of multiplayer, I’m now at Level 48, with a kill-to-death ratio of 0.53. I’ve gotten 88 headshots, six triple kills, and one thumper, or a triple kill with my special weapon, the grenade launcher. I can now manage to survive Team Deathmatch rounds with a kill-do-death ratio above 1.0, and I earn about 127 points per minute. I’ve had 1,223 total kills. I’m on the winning team about half the time. In Domination mode, I’ve secured 119 locations. (You can check these stats in the lobby leaderboards section or by hitting the Options button on the PS4. You’ll see the details on your kills in the Barracks section and your stats on game modes such as your win-loss ratio in Domination).
Vonderhaar’s tips, and more of my own that I’ve gleaned during my own play, may be broadly useful. So here they are.
Be patient.

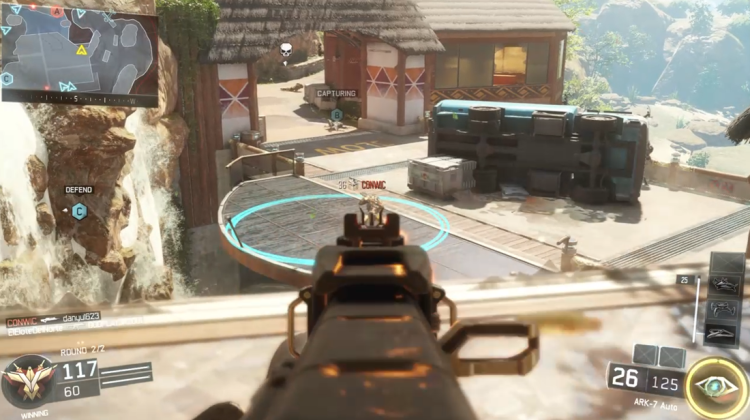
Above: That’s me on the right. I came in third in this match.
If you just keep playing, you’ll get better. You can get better with practice. Try a variety of maps, modes, and weapons. Figure out what you’re good at. Resist the urge the jump too much, even if it is fun. It just makes you a target until you master shooting while jumping. And make sure you warm up first and then get serious. With every step up, you can celebrate. And once in a while, you’ll get in the top three scores in a match.
As you level up, you also get access to much better weapons. These make you more powerful. They improve your accuracy and the damage you do, enabling you to compete with the veteran players better.
Here’s some examples of the good things you can get just by waiting. When you hit Level 9, you can unlock the HC-XD remote-controlled drone as a Scorestreak. So when you score a few kills in a row, you are rewarded with a drone, which you can pilot and use to remotely kill an enemy soldier. It only counts as a quarter of a kill, but it’s very satisfying.
At Level 12, you can get the Care Package Scorestreak. If you get multiple kills in a row, you can send for a Care Package. It will drop a random Scorestreak, including some high-value ones occasionally, that can help you rack up the kills in a match. At Level 17, you can get a Trip Mine. This lethal grenade can be planted in the ground. When an enemy runs by it, it blows up. It’s perfect for helping you watch your back while you are camping or sniping. In Domination mode, you can use it to create a booby trap on one of the three locations that each side battles to occupy.
At Level 43, you can get access to a Sheiva Assault Rifle, which is pretty accurate and deadly. At 45, you can get a Hardened Sentry Scorestreak, which lets you plant an auto sentry gun that will shoot anything that moves in front of it.
Find the right gun for the job.
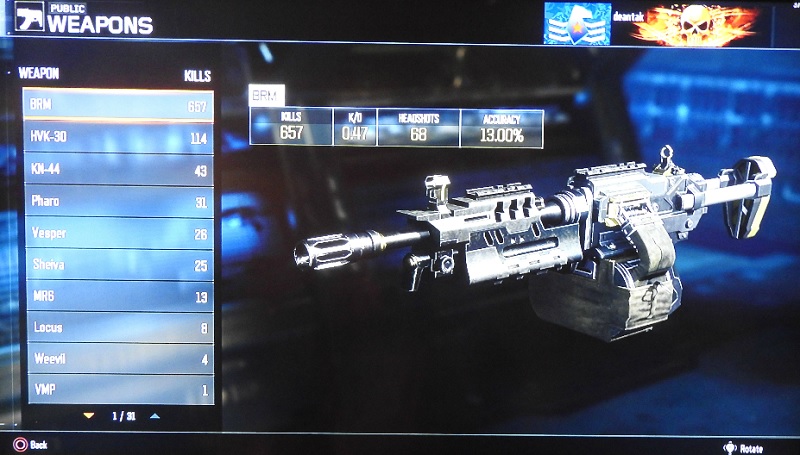
Above: My stats on the BRM light-machine gun are far better than with other weapons.
When you’re starting out, you may be temped to use the assault rifle as your default weapon and just level that up. But over time, you should choose the right gun that works on a given map. If you do this, you may get much better results. On maps with lots of indoor fighting or short shooting distances, you have to be quick on the draw. That means you’ll need a submachine gun. With the Core maps, there weren’t that many that fit this type, so I didn’t do much to level up the submachine gun. If you watch some of the quickest players on Twitch, however, you’ll notice them using submachine guns with great skill. They often jump high in the air rather than just run around corners. That gives them a vertical edge on anyone who is simply running around a corner. It’s harder to shoot while you’re in the air, though. So I never played that game. I simply prepared myself to shoot low or high when I rounded corners.
I didn’t find the right assault gun until I leveled up to 43 and got access to the Sheiva marksman rifle. It’s deadly and accurate, but it doesn’t fire a lot of shots at once. But it can take out infantry with a couple of shots, and sometimes just one shot. You only get 15 shots in a clip, but that’s often enough to get multiple kills. I’m glad I didn’t level up my other assault rifles until I got the Sheiva.
But my favorite weapon for an old-timer, or a noob, is the light machine gun. In this category, I stuck with the very first gun I had access to, the BRM light machine gun. It’s a tough gun to use early on, when you don’t have a gunsight or a stabilizer. It shakes a lot, and it’s slow on the draw. But it packs a big punch and can really destroy enemies quickly. It’s best used when you want to camp in one spot and wait for the enemies to run by. It has good range, as good as a sniper rifle in most cases. But it’s a lot easier to wield than a slow-loading sniper rifle.
When you level up the BRM to the top level and get an ELO gunsight, it becomes deadly accurate. And when you fire, the bullets do a lot of damage. So you don’t have to be as accurate by hitting the enemy multiple times, even at great distances. As long as you add the right attachments, use the right perks, and find the best places to camp out, you’ll be able to do a lot of damage with this gun. I didn’t level up to the higher-rated LMGs because the BRM is pretty powerful as is. This gun was key to turning around my kill-death ratio, and it made me as deadly as a sniper without making me as vulnerable as a sniper.On top of that, even if you don’t always take out the sniper on the other side of the long-distance space, you do a big service for your teammates in denying the sniper the free use of the deadliest perch. All told, I’ve logged 657 kills with the BRM.
Use the right loadout with your gun.
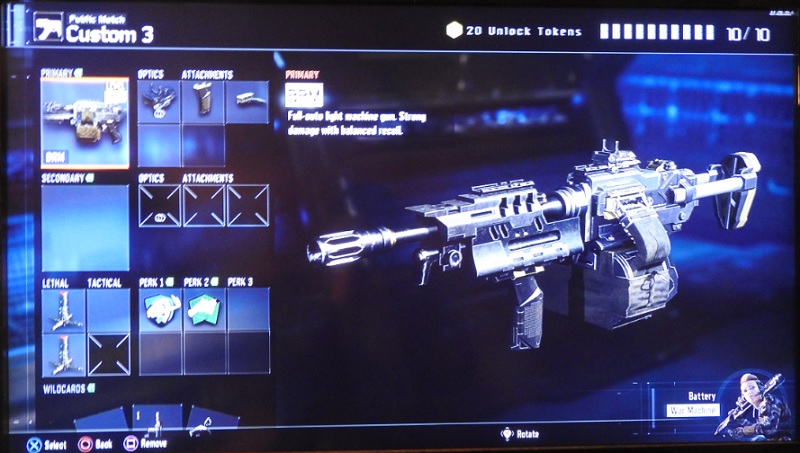
Above: Here’s my loadout with the BRM LMG. The Trip Mines are critical.
As I mentioned, you have to make sure you use the right attachments on your weapon. You get 10 points in the Pick 10 system to allocate to your weapons kit. With my light machine gun, I added a gunsight. That’s a no brainer. I also added a grip to make it more accurate. I didn’t need the extended ammo magazines because I rarely stayed alive long enough to make use of them.
I got rid of my secondary gun, which I almost never used. And, once I reached level 17, I added the Trip Mine, which you plant in the ground to cover your back. When someone approaches from behind, then it blows up and you get an extra kill. I liked this so much that I added two Trip Mines, so that I could cover two doorways or trick the experts who would defeat the first Trip Mine and then run into the second. For my remaining Pick 10 points, I added a “fast hands” and faster timer on my Specialist’s weapon. The Trip Mine grenades go perfectly with the camping strategy and the light machine gun, and they make it far more survivable for the strategy of drawing the enemies to your killing zone.
With five types of weapon classes, there are more than a 100 options for you to specialize in, Vonderhaar noted. There are also a lot of options with attachments, accessories, and perks. You can’t master them all, but there’s a big payoff if you master the right ones.
Pick the right Specialist.

Above: Battery’s War Machine ability is a noob’s dream: the grenade launcher.
I also learned that my Specialist, one of nine different characters available to play, was also very important. I used Battery, a cigar-choming woman whose Specialist “War Machine” ability activates a grenade launcher. The grenade launcher only has a limited number of shots and a limited time meter, but it is deadly. I had multiple double kills and even a triple kill once because of the grenade launcher. (Battery was also Vonderhaar’s favorite). It’s a very satisfying weapon that can kill even if you aren’t hitting the enemy with a bullseye.
The only trouble with the grenade launcher is that it has a relatively short range. So when I earned the grenade launcher, I’d have to get up off the floor and start running around. The good thing about it, from a noob’s perspective, is that the grenade launcher gives you an instant kill if you run into another enemy coming from the opposite direction. If you get one good shot off, you can take out your enemy before he or she can react. The grenade launcher comes up faster if you use the Overclock, a perk for a faster timer on the Specialist ability. I was always disappointed if I didn’t get at least one kill with the grenade launcher before it disappeared from my hands due to the time limit or ammunition limit.
Master the maps.
Above: This is the camper’s dream window in the Fringe map.
If there’s a map with a long distance view, that’s great for snipers. And it was also good for me with my BRM gun, which packed a powerful punch at long range.
I found that some of the maps were perfect for my camping strategy, where I would stay put with the LMG and protect my flanks with Trip Mine grenades. The Fringe map was one of these. I would go into the big buildings with a window that looked over the main thoroughfare. Then I would stay there and shoot whoever appeared in the window at the other building. I did the same on the Combine and Breach maps, even though the range was very short from one perch to the target area. I also used my camping strategy to great effect in Hunted, Infection, and Stronghold maps, which also have long-distance shooting positions. It also worked great in either Domination or Team Deathmatch modes.
But the same tactics and same guns don’t work all of the time. My LMG camping strategy didn’t work so well in Redwood, however, because enemies were constantly coming up from behind or converging on the sniping points. The same was true for Aquarium, Metro, Exodus, and Havoc. On those maps, I used an assault rifle and ran around more to find enemies on the run.
Of course, once you get used to these maps, the downloadable map packs will come and you’ll have to learn them all over again. The key isn’t to stay in one spot the whole time. You can get a few kills from one location. But if you stay there, the enemies will learn to sneak up behind you and eventually learn how to shoot out your Trip Mine grenades.
Make them come to you.
Above: Here’s the record of my achievements in various Black Ops III matches.
If I haven’t made it abundantly clear so far, you have to realize as either an old gamer or a noob that the quick-draw youngsters have an advantage over you. They are faster and more accurate. So you have to turn the tables on them. With the Trip Mine grenades, you can stay in one place without worrying that someone will come up behind you. A friend in multiplayer also serves the same purpose here, but I was never able to enlist a stranger to do this for me. Then you can stay in a spot and make the enemy come to you. When they do, you’ll be ready to pull the trigger, while they’ll be running fast. It’s the only way I know to even the odds in multiplayer. The problem is that they will eventually learn you are taking this strategy, and they will adapt. Once they start changing tactics, you have to shift as well. For me, that means getting a couple of kills in camping position, and then turning around and waiting for them to sneak up on my position. This change can usually net a couple of more kills.
If you survive long enough to execute this strategy, you can get a Scorestreak such as a UAV (a drone that identifies enemy locations on a mini map) or a HC-XD explosive remote drone. And that will help your team a lot.
Don’t forget to change things up.
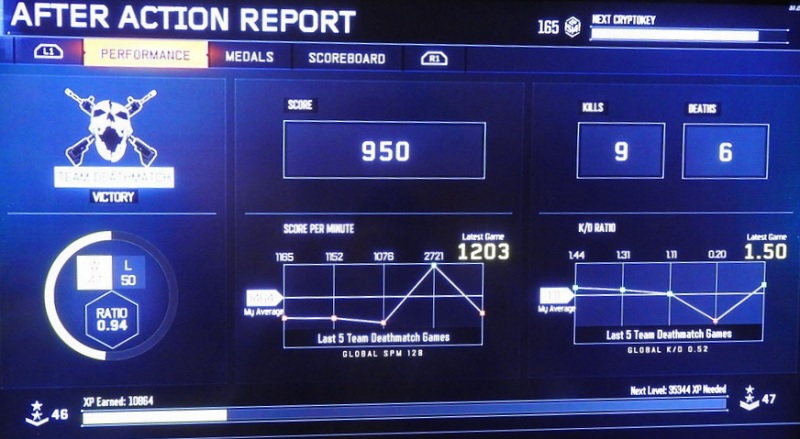
Above: Here’s the results form a recent after-action report. It is possible for an old guy to get some kills.
As soon as you become comfortable with a gun or a class of weapon, you’ll start leveling it up fast. Once you hit the maximum level with that gun, it pays to start leveling up your other weapons, such as sniper rifles or shotguns. I haven’t gotten to this point yet. But you have to consider mastering multiple guns as important as changing things up in the middle of a match. Over time, you’ll become much more deadly on any map if you can fight with leveled-up weapons. You should also get used to fighting in 3D, using the vertical space by mastering the ability to jump high or cross divides with double jumps.
And that, my readers, is my advice for newcomers and oldies on how to survive on the modern battlefield. For at least a couple of minutes.
VentureBeat's mission is to be a digital town square for technical decision-makers to gain knowledge about transformative enterprise technology and transact. Learn More
